The Nerdy Guide to Google Analytics 4 – Setting Up Your Account
by NerdyMind |
August 16, 2022

In October 2020, Google unveiled Google Analytics 4 (GA4), the newest version of their Analytics program. Google previously referred to this version of Analytics as their web + app property. The goal for this program was to measure website data along with apps. Google has since relabeled it Google Analytics 4 and it is set to become the default Analytics platform by July 2023. They plan to phase out the current version of Analytics—Universal Analytics—in the meantime. By summer of next year, Universal Analytics will no longer collect data. Legacy data, however, will remain available for those with Universal properties.
With the transition around the corner, it’s time to make the switch from Universal Analytics to GA4. GA4—in our opinion—is a little less user-friendly, and more complex to set up than Universal Analytics. Don’t worry though! The NERDs did the research and put together this helpful guide. We’ve spent the last two years among the circuits and wires of this warpdrive to learn everything we can. Every day brings new discoveries, but here’s how you can get started with GA4.
Note: This blog will guide users through the account creation process who do NOT have an existing Universal Analytics account and are creating their first Google Analytics account. If you already have a Universal Analytics account, find the GA4 set-up assistant in your admin section and skip to Step 2 of this guide.
Step 1: Create Your Account
To create a GA4 account, thankfully, is still as simple as it was to create a Universal Analytics account. The first step is to access the Google Analytics homepage, and click on the call-to-action button that reads “Start Measuring.”

Once you click the button, the Account Setup page should appear. On this page, you will fill in the account name and select a few account data sharing settings. If you’re acquainted with Universal Analytics, these options might seem familiar. For context though they are:
Google Products and Services – Allows Google to access and analyze data to understand online behavior and trends in order to improve their products and services. Turning this feature on allows account owners to use Enhanced Demographics & Interest reporting.
Benchmarking – Permits aggregation of data with data from other websites and apps to better understand data trends within industries. This setting helps Google develop tools and learn more about industry benchmarks to advise industry market trends.
Technical Support – Grants Google Analytics support representatives access to your account to assist with technical issues.
Account Specialists – Authorizes Google account specialists the ability to assess the efficacy of different implementation strategies and account configurations within Google Analytics. This setting also grants Google sales experts access to your account data to offer more customized recommendations.
To create a GA4 account, you don’t need to agree to any of these options. Only select the boxes with which you are comfortable. You can update these settings in the future, if needed.

After completing the above steps, you will end up in the Property Setup section. In this section, you will need to name your property, select your reporting time zone, and select your currency (the default is USD).
There is an almost hidden section underneath the Property Setup section, called “Advanced Options.” Advanced Options will allow you to create a Universal Analytics property if you want one. If you’re familiar with Universal Analytics, and need time to get used to GA4, we recommend setting up a UA property. If this is your first time with Analytics, however, you can ignore this part. It’s better to dive head first into GA4 than to learn two Analytics programs at the same time.
If you choose to create a Universal Analytics account, you’ll need to input your website’s URL and select the option to create both a GA4 and Universal Analytics property. There’s a second option to only create a Universal Analytics property underneath—don’t do it! We’re less than a year out from the switch and it’s no longer valuable to only have a Universal Analytics property.
Finally, you’ll need to answer a few questions about your business in the aptly named Business Information section. These questions entail:
Industry Category
Business Size
Analytics Intent
Answer these questions and finish the setup and click “Create.”
Step 2: Create a Data Stream and Tag Manager Account
The next step to achieve your data measuring dreams (everybody dreams in spreadsheets, right?) is to create something known as a data stream. For those experienced with Universal Analytics, a data stream is similar to a View on that platform. Data streams are sources for information that feed into your property. Like Views, you can have as many streams as you like. You can have a stream for your website or one of your apps.
Creating a data stream is a fairly simple process, but there’s more than one way to accomplish setting it up. First, if your website has a global site tag (gtag) installed, then you’re good to go! Data should flow into your Analytics property within 24–48 hours. If you do not have a gtag already, you can manually install one which GA4 provides you.

We recommend an alternative option which is to install Google Tag Manager instead. Google Tag Manager—or GTM—is an excellent tool that allows you to inject scripts into your website without having to dive into the code. The inherent benefit is that you won’t need a developer to help you add future scripts. You will, however, possibly need a developer’s assistance with GTM set-up. We’ll get to that momentarily.
If you choose to go the Tag Manager route, you’ll need to set up an account with the program. Setting up an account with Tag Manager is also a simple process. Go to tagmanager.google.com or select the dropdown from your Analytics account.

In Tag Manager, click “Create Account” and name your account, select your country, and select the target platform you want to track. Once that’s done, you’re all set with Tag Manager … almost!
The final step is to install the tracking snippet. This is the only time you’ll need to dive into your website’s code for Tag Manager. If you are nervous about messing with code—or afraid of breaking something—we recommend asking a developer to install it for you.

Now you can create your tracking tag for GA4! You can do this after installing Tag Manager or before; it makes no difference. To create your GA4 tracking tag, navigate to the Tags section on the side nav and select “New.”
From there you’ll need to name the tag and create a “Tag Configuration” and “Trigger.” When naming the tag, we recommend using a combination of the tag configuration and trigger. This naming convention will make it easier to locate the tag, especially if you plan to have several. In our example, we named our tag “GA4 – All Pages.”

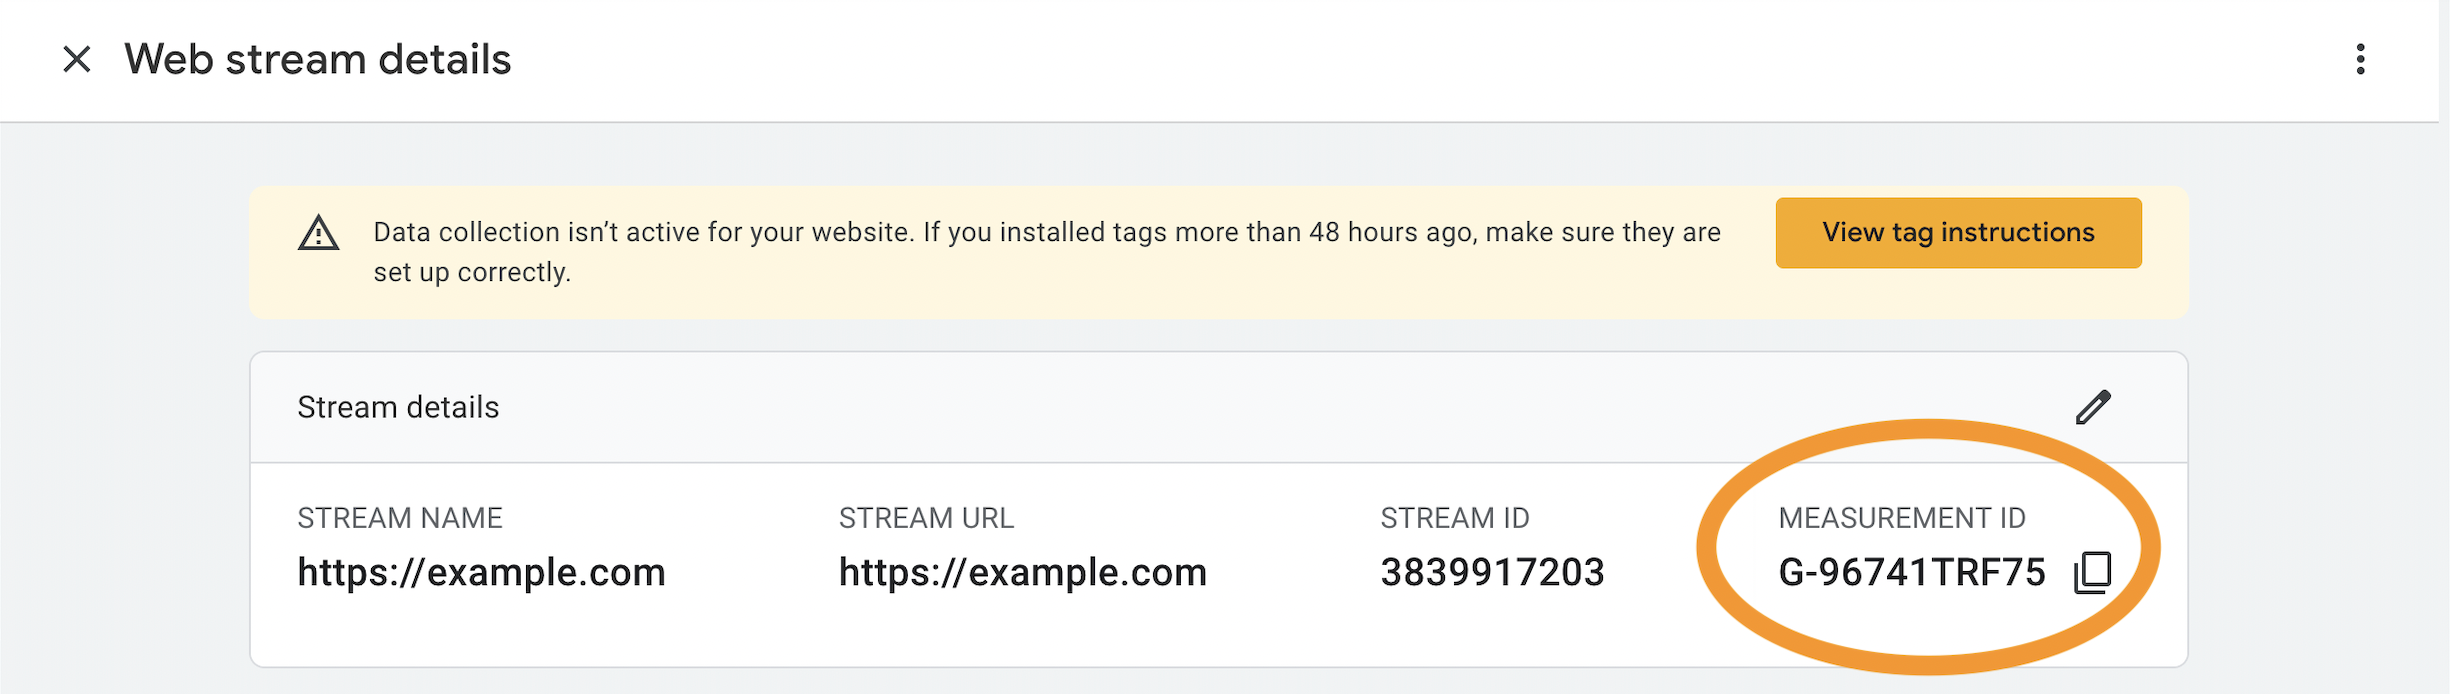
Tag Configuration: When setting this up, select “Google Analytics: GA4 Configuration” from the list. Copy the Measurement ID provided by GA4 in the “Stream details” box.
Paste the Measurement ID into the field and proceed with tag trigger set-up.
Click on the “Triggering” box and select “All Pages”. This trigger signifies that the tracking code will be implemented on all pages of your website.

You’re almost done! Click “Save” in the top right-hand corner. Hit “Submit” and pat yourself on the back. You just implemented your first GA4 tag!
Note: When creating tags in Google Tag Manager, it’s wise to test your tag to be sure it’s working. If you installed your Tag Manager snippet, you can select the “Preview” button in the platform and test the tag to ensure it’s operational.
Step 3: Engage Data Collection!
Your new data stream will need about 24–48 hours for data to start appearing. To test your data stream, go to the “Real Time” reports section in your GA4 property and go to your site in another tab. If you do see yourself, you should be good. If not, you’ll need to revisit your gtag or Tag Manager account and see what went wrong. We recommend checking this out a few hours after you create your account.
Google Analytics 4 will be the default Analytics option by July 1, 2023, whether we like it or not. Don’t panic! Take the time now to create those accounts and become familiar with the program. Google Analytics remains a major part of our digital marketing lives. GA4 will likely not be any different in that respect. It’s time to boldly go!