Facebook Business Manager – Why It's a Best Practice
by NerdyMind |
May 31, 2017
Business Manager: So, What Is It?
If you’re like a majority of businesses on Facebook, you are probably used to managing your page and ad account through your personal Facebook login. But did you know there’s a better way that allows you to separate your personal and business lives on Facebook? Simply put, Facebook Business Manager is exactly that, a digital dashboard designed specifically for managing your business’ Facebook assets outside of your personal Facebook account. Assets include your page itself, ads, products, apps associated with your account, employees and admins, or the credit card that is paying for everything.
Business Manager was created as a tool for businesses to allow people to manage their accounts more efficiently and effectively – and without having to be directly linked to a personal Facebook account. If you’re still managing your business’ Facebook assets the old-fashioned way, you may want to consider migrating over to Business Manager, and we’re here to help! We’ve included step-by-step instructions below to get you started.
What Will Be Different?
Access Management and a Super Cool Dashboard
Instead of accessing your business or organization’s page from facebook.com, you will go to business.facebook.com in your browser, this is where your new dashboard will be located. A Business Manager account is specific to a business not a personal profile, meaning only one person from your business or organization needs to create a business manager account for the business. All other admins can be added and allowed to manage the account by the account creator. Once you are added to your business’ Facebook Business Manager account, you have the option to change your email address to your work email in order to keep your personal inbox work-free.
Business Manager’s access management features makes it easy to avoid awkward conversations when someone’s access needs to be removed from your business’ Facebook accounts.
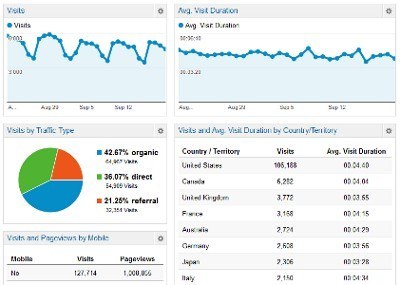
From your dashboard, you will see a clear overview of your page and ad accounts – where the date range can be adjusted to show metrics from Yesterday, Today, the Last 7 Days, or the Last 28 days. When managing your pages and ad accounts from your personal page, you still have access to these metrics, but for some finding the data might feel like going on a scavenger hunt.
If you are a creature of habit (it’s ok, some of us are too) and you try to manage your page directly from facebook.com (the way you used to), Facebook gives you a polite reminder that you will need to switch over to Business Manager to continue.
Why Should I Switch?
Separate Business & Personal
With traditional Facebook page management, in order to be added as an admin on an account you must have a connection to the page via being friends with a coworker or being a “fan” of the page from your personal Facebook account. This way of managing your page makes it less clear whether you are interacting with Facebook from your personal account or your business’, specifically when “sharing” content or “liking” and engaging with other posts. Less savvy Facebook users on your team might make an embarrassing mistake by sharing a meme or writing a politically driven post on the wrong page (Facebook actually created Business Manager as a solution to this common complaint).
When you get home from a long day at work, the last thing you want to do is login to your personal Facebook account and see notifications about what is going on with your business. Not only will Business Manager help to prevent you from accidentally engaging with content as your business, it will also separate your business’ notifications from your personal. After adding your page to Business Manager, your business’ notifications will only be visible when you are logged into business.facebook.com.
Beware Pseudo Business Accounts
In order to avoid having to login or share personal Facebook information with coworkers, many business owners and marketing managers created a pseudo account with a fake name and a shared login. This allowed them to add their clients/co-workers as a friend in order to establish the connection needed to add people as an admin on the account, while keeping their personal profile private. Shortly after the launch of Business Manager, Facebook made a change to their terms and conditions strictly prohibiting the use of any fake accounts, business related or not. This new policy is heavily enforced by Facebook’s bots who constantly scan the social media platform looking for suspicious accounts. If you become one of those unlucky users who is tracked down by the ever diligent Facebook police, your account will be deleted without warning with no possibility of recovering it (if this happens to you and your account isn’t fake, it can be recovered simply by submitting an appeal and attaching a photo of your ID). If your page is currently managed through a fake account or a shared login not tied to a real user, you should switch to using Business Manager as soon as possible.
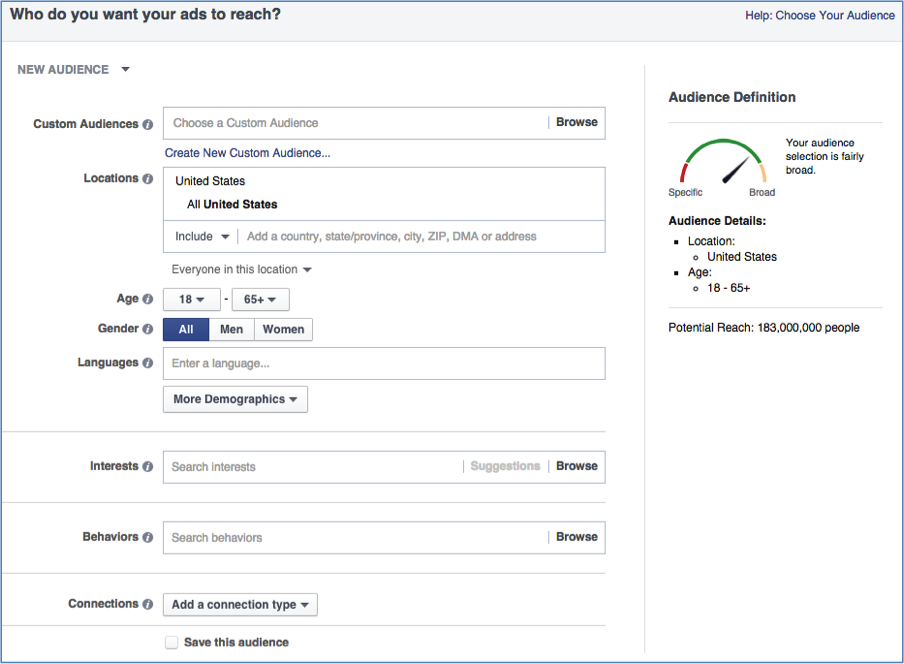
Despite the horror stories of losing access to your social media accounts, there are a lot of other practical reasons to switch to business manager such as gaining access to more tools and resources that Facebook has to offer your business like Power Editor for Ads, Pixels, and Audiences.
How Do I Set It Up?
Setting up Business Manager is so quick and easy – you will wonder why you haven’t already done it! Don’t forget, only one person from your business/organization needs to complete these steps.
Getting Started – Create Your Account
1. Login to business.facebook.com and click “Create Account”, this is the main call to action in the center of the page.
Don’t confuse creating a new account with getting rid of your old page – once you make the switch to Business Manager your page in its entirety will look the exact same to your followers, and you won’t lose any legacy information (posts, photos etc.)
2. From here you will be asked to login to your personal Facebook account, you will continue to use the login information from your personal account to access your Business Manager.
3. Next, you will be prompted to enter the name of your business, select the primary Facebook Page (in this case your business’ page) and enter your work email address. Entering your work email address in this field will not change the email address associated with your personal Facebook profile. Continue with the onboarding steps by entering in the rest of the information in the required fields. Customize your Business Manager with a profile picture and cover photo!
At this point in the setup if you don’t already have a business page you will have the opportunity to create a page for your business with the assistance of Business Manager.
Adding Other Assets to Your Business Manager (People, Ad Accounts, or Other Pages)
Adding People
1. Start by clicking “Business Settings” in the top right corner of your main dashboard screen (remember your cool new dashboard from above?). This will open up your settings in a new tab on your browser, here you will see a top navigation as well as a navigation with icons along the side. If you aren’t sure which icon stands for which item in the side navigation, you can hover your mouse over the icons to open up the full menu.
2. The default menu in “business settings” takes you directly to your “People” tab in the left side navigation. From this tab you can add people to your business, see what pages existing users have permissions on, change their permissions, assign new assets (ones that you already have access to in your business manager), as well as delete user access to certain pages or remove people from your business manager altogether. Once a page is added to your Business Manager you must come back to this menu to assign it to the people on your team that need access.
3. To add people, you simply click the “Add People” button on the top right corner of this page, enter the person’s email address, and select what kind of team member you want them to be, either a Business Employee or Admin. The specific permissions for each of type of team member are listed in the pop-up. Once your team member has accepted their invitation to join your business manager you will be able to manage their access here. If you add other admins to your team, those users will have the ability to manage their own access and the access of others.
4. You can also add people to certain pages or ad accounts from the “Pages” and “Ad Accounts” tabs on the side navigation. Don’t forget to hover over the navigation to see the full menu! Once you have selected the page or ad account you want to add people to, simply select the “Add People” button to the right of the asset name. This feature will only add people to assets that are already being managed by your business manager.
Adding Pages and Ad Accounts
1. To add a new page or add account to your Business Manager, simply find the “Page” or “Ad Account” tab on the side navigation and at the top right, select the drop down menu for “Add New”. The drop down gives you three options when adding a new page or add account, to “Claim”, “Request Access”, and to “Create New”.
2. Only pages that you are currently an admin on (a page or ad account that has not already been claimed by a business), can be claimed. For any pages that already exist, you will need to request access to the page. When you send a request for access, Facebook will send the page owner a notification. If you choose to create a new page or ad account, one will be created and added with guided prompts from Business Manager.
3. Once a page or ad account is created, don’t forget to add people to it with appropriate access and permissions.
Adding Partners (marketing companies, social media managers, etc.)
1. You must be an admin on a page or ad account to add a partner. If you are an admin, adding a partner is as simple as adding an employee’s access.
2. From the “Pages” or “Ad Accounts” tab, click on the page or ad account you wish to add a partner to. From there, to the right of the name of the page there should be four buttons (if you are not an admin of a page you will only see three buttons here). Click “Assign a Partner”.
3. From here a pop-up will appear on your page prompting you to select what role you want the partner to have in your Business Manager account. Once you have selected a role, a link will generate, copy the link and paste it into a message or email to whomever you would like to assign as a partner. After they have clicked the link and assigned themselves as a partner this will add their business as a whole to whatever page or ad account you have specified. From there they can assign their team members to your account.
4. Another option on this pop-up is to “Connect your Page using your partner’s business ID instead.” In this case, the business that you are assigning as a partner will need to provide you with their business ID number.
So What Now?
Here is a quick checklist to make sure you have everything set up:
Your Business Manager Account has been created
You have added fellow employees to the Business Manager account – it’s always good for the business owner to have access
You have claimed your business’ existing page inside of Business Manager
You have claimed or started a new business ad account
You have added your fellow employees to your business’ page and ad account
(Optional) You have added a business partner/agency to your page and ad account
We’re always happy to walk our new clients through this process as needed. Having a Business Manager account helps separate your work and personal life, which makes things easier for everyone. We recommend you get started with Business Manager today as Facebook is always making more and more great enhancements and updates to evolve Facebook as a must-have marketing tool for businesses.